

AbstractThis document provides guidance and instructions on the installation, configuration and management of the DesignBais Web Component (WEBCOMP). Definitions
Quick StartThis short procedure is for a Windows 2012 server. It is assumed that the DesignBais Data Component (DATACOMP) has already been installed on the same server or on a different machine.
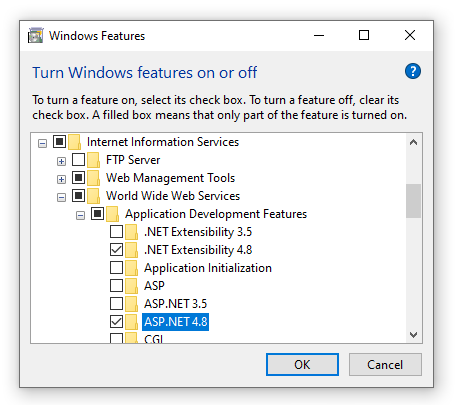
This is your DesignBais development environment in a browser. You can now refer to your DesignBais Developers Manual which provides guidance and details on how DesignBais is used to develop web based applications. System RequirementsOperating SystemDesignBais web component (WEBCOMP) runs on Windows Vista, Windows 7, Windows 2008, Windows 2012 and later Windows operating systems Microsoft .NET FrameworkDesignBais requires .NET Framework Version 4.6.1 or later. You need to install .Net framework 4.6.1 on Windows operating systems earlier than Windows 2016 Server and Windows 10 [v1607]. IIS Web ServerInstall IIS if not already installed
Windows Role Services and FeaturesSecurity
Web Server (IIS) > Application Development ASP.NET 4.5 .NET Framework 3.5 Features 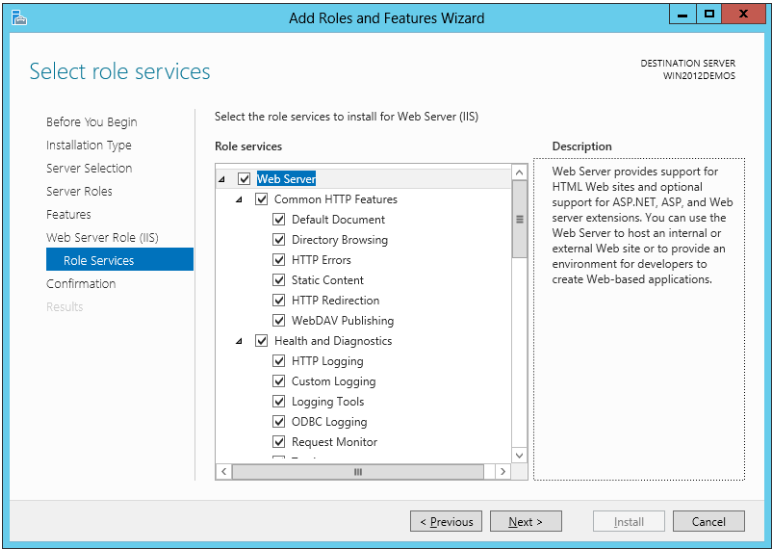
On Windows 10 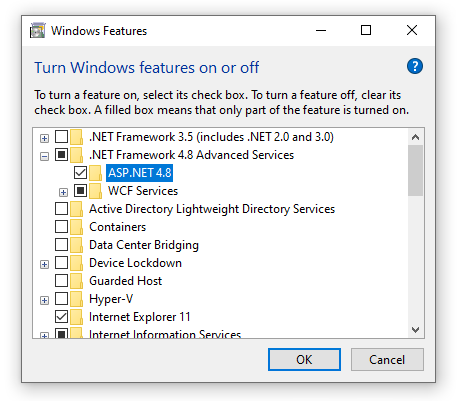
DesignBais Data ComponentInstall the DesignBais Data Component (DATACOMP) either on the same server (i.e. the web server) or on a different server. The DesignBais Web Component (WEBCOMP) communicates with the DATACOMP via the TCP/IP port of your database's connection mechanism. These are the default ports:
Note that in most deployments you won't need to change these ports but if needed, db.config file can be used to specify a different TCP/IP port by adding a new node named "connectionSpecs" under the root node dbconfig. <connectionSpecs> <connectionSpec type="UNIVERSE" port="31438" host="192.168.199.2"/> <connectionSpec type="UNIDATA" port="31438" host="192.168.199.3"/> <connectionSpec type="D3" port="9000" host="192.168.199.4"/> <connectionSpec type="ONSYS" port="3471" host="192.168.199.5"/> <connectionSpec type="ONWARE" port="8888" host="192.168.199.6"/> <connectionSpec type="JBASE" port="8236" host="192.168.199.7"/> <connectionSpec type="QM" port="4242" host="192.168.199.8"/> <connectionSpec type="UNIVERSE" port="31438" host="192.168.199.9" pooling="native" defaultloginUser="dbnetuser" defaultloginPassword="dbnetuser"/> </connectionSpecs>Browser SupportAll modern browsers are supported as of 2019 March. DesignBais does not support IE7 and earlier versions (less than 1% market share in recent statistics) Installation and Uninstallationdbnet.zip (DBNET template)Download the DesignBais web component (dbnet.zip) from www.designbais.com and unzip it to folder c:\inetpub\wwwroot. This will be the physical directory of your DBNET. Your DBNET's full physical path becomes: c:\inetpub\wwwroot\dbnet You can rename the folder "dbnet" as needed. PDF Document GenerationDesignBais versions after 7.2.2.2694 use HIQPDF for PDF document generation by default. For PDF report generation, DesignBais uses a third party component, HIQPDF. This component is licensed for distribution with DesignBais. HIQPDF is an integral part of DesignBais and it does NOT require installation. Advanced Usage (pdfConsole)If your application generates a lot of PDF documents and some of these documents are large (e.g. more than about ten pages) then you should consider shifting some of the load to the DesignBais pdfConsole running on an external dedicated server. This will reduce the stress on your web server and improve the reliability of your application. Setting up DesignBais pdfConsole on an external PDF serverYou can set up a Windows server (Win 2008 or later) as a dedicated PDF server. Multiple (e.g. eight) CPUs are recommended. The speed of PDF document generation depends on the number of CPUs and the available RAM.
<dbpdf> <setup> <adminEmail>admin@somedomain.com</adminEmail> <smtpHost>mail.somedomain.com</smtpHost> <smtpPort/> <smtpEnableSsl/> <smtpHTMLFormat/> <smtpLogin/> <smtpPassword/> </setup><dbnet> <pickMask>0-31</pickMask> <baseUrl>http://somedomain.com/dbnet</baseUrl> <basePath>C:\DBNET</basePath> <login>dbnetuser</login> <pass>dbnetuser</pass> </dbnet><dbnet>OTHER DBNET</dbnet> <dbnet>OTHER DBNET</dbnet> </dbpdf>
Note that pdfConsole automatically encrypts your password entered in pdfConsole's dbpdf.config. The encryption is applied within few minutes after entering or changing a password
The node HIQImageCompressionLevel is created automatically and their values are set to those specified in admin/db.config of the corresponding DBNET.
pdfConsole generates logs in its \logs directory. Check this folder for troubleshooting PDF generation errors. Also including this folder in purge routines might be a good idea. ABCPDF (Optional)ABCPDF can still be used with DesignBais versions after 7.2.2.2694. If you prefer that, you need install this component and select ABCPDF in DesignBais > Global Parameters > General Parameters. To install ABCPDF,
Installation on Previous VersionsYou don't need to uninstall previous versions (Version 6 and earlier) of the DesignBais Web Component (WEBCOMP) but, we recommend disabling the DesignBais Service in Windows Services. UninstallationThe DesignBais Web Component (WEBCOMP) does not require a special uninstallation program. All you need to do is to disable access to the DBNET virtual folder in IIS. If installed, the ABCPDF component can be unistalled using the Windows Control Panel, Add/Remove Programs You can also delete the DBNET folder but you should do that after uninstalling the ABCPDF component. ConfigurationIn this section, configuration instructions are provided for Windows 2012 servers. Configuration on other operating systems is similar. Special User AccountsDesignBais Connection User: Create a Windows user both on the web server and on the database server as the "DesignBais Connection User". On both servers, the login name and the password should be the same. This user does not need to be added to the database as a DesignBais user. DesignBais Public User: Create a DesignBais user (e.g. "dbpublic") on the database server. Note that this does not need to be a Windows user. IIS ConfigurationIIS Application PoolIn IIS, create a new application pool (e.g. DBNetPool): Note that the dialog may display .NET Framework 4.0 despite that .NET Framework 4.6.1 has been installed. 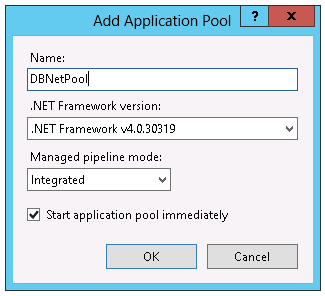
Accept defaults in the "Advanced Settings" for the created application pool, except:
Security Tip:Following your initial tests (including a PDF report test if you use PDF reports), set the application pool identity to "ApplicationPoolIdentity" and give the ApplicationPoolIdentity "full control" access on the following folders:
32-Bit applications are enabled due to some third party components used in DesignBais. Virtual Folder (DBNET)In IIS, convert your DBNET to an application. To do that, right click your DBNET's name in IIS (e.g. dbnet) and select "Convert to Application". Select DBNetPool as your application. 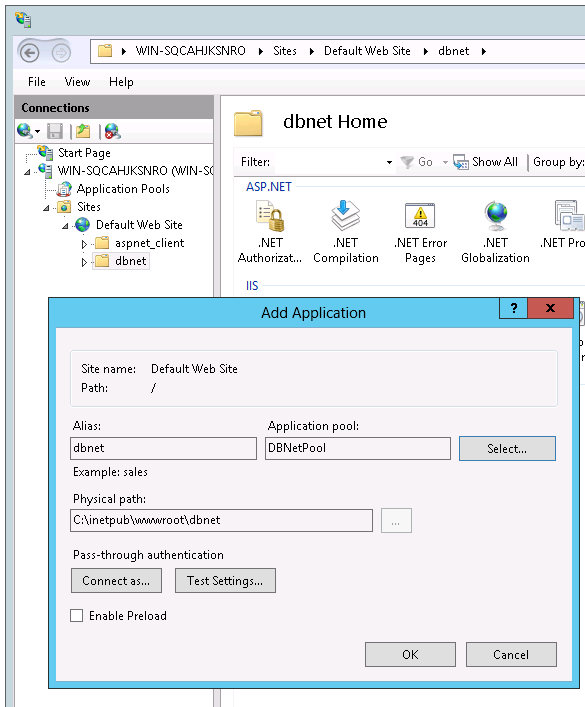
AuthenticationEnable the required authentication method in IIS. If your DBNET requires anonymous access then enable both "Anonymous Acess" and one of the other authentication modes that requires login (e.g. 'Basic Authentication', 'Windows Authentication' etc.). This is needed to secure sensitive folders and functions such as the source code editor. 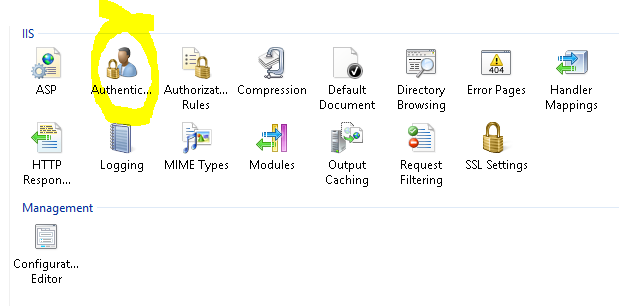
web.configOverviewSome additional IIS parameters are configured in web.config of your DBNET. Using web.config, DBNET folders are secured against unauthorised access. This is also where read/write access to folders is configured. web.config file is located in the DBNET root directory. IMPORTANT: For better security, replace the default login names (e.g. dbnetuser, designbais, dbpublic etc.) in your admin/db.config and web.config with other names. In most deployments you'll need to change only the user login names provided in the default web.config file. Code Editor SecurityThe Code Editor must not allow unauthorised access. In this example, only two users are given access. Add other Windows user login names as needed. <location path="codeeditor" allowOverride="false"> <system.web> </location><authorization> </system.web><allow users=".\designbais"/> <allow users=".\administrator"/> <deny users="*"/> </authorization>A Code Editor session does not time out Admin SecurityThe admin folder must not allow unauthorised access. In this example, only two users are given access. Add other Windows user login names as needed. The Admin folder contains various test functions. <location path="admin" allowOverride="false"> <system.web> </location><authorization> </system.web><allow users=".\designbais"/> <allow users=".\administrator"/> <deny users="*"/> </authorization>Debug Folder SecurityThe debug folder must not allow any access. <location path="debug" allowOverride="false"> <system.webServer> </location><handlers accessPolicy="None"/> </system.webServer>Documents Folder SecurityThis folder is configured to allow read access only. Your application may not need this folder. <location path="documents" allowOverride="false"> <system.webServer> </location><handlers accessPolicy="Read"/> </system.webServer>EmailLog Folder SecurityThis folder must not allow any access. The EmailLog folder keeps logs of emails sent out by the system. <location path="emaillog" allowOverride="false"> <system.webServer> </location><handlers accessPolicy="None"/> </system.webServer>Keystore Folder SecurityThis folder must not allow any access. The Keystore folder keeps small files used only by the system. <location path="keystore" allowOverride="false"> <system.webServer> </location><handlers accessPolicy="None"/> </system.webServer>Uploads Folder SecurityThis folder is configured to allow read access only. Your application may use this folder to store uploaded files. <location path="uploads" allowOverride="false"> <system.webServer> </location><handlers accessPolicy="Read"/> </system.webServer>Uniobjects ConfigurationYou don't need to install the UniObjects since it is already provided as part of the DesignBais web component. Include these sections in your web.config file if you're using Universe or Unidata in connection pooling mode. Refer to your UO.NET manual for details on these parameters. <configSections> <sectionGroup name="UO.NET"> </configSections><section name="General" type="System.Configuration.DictionarySectionHandler"/> <section name="ConnectionPooling" type="System.Configuration.DictionarySectionHandler"/> </sectionGroup><UO.NET> <General> <add key="SocketTimeOut" value="300000"/> </General><ConnectionPooling> </UO.NET><-- add key="ConnectionPoolingOn" value="0"/ --> <add key="MinimumPoolSize" value="2"/> <add key="MaximumPoolSize" value="2"/> <add key="IdleRemoveThreshold" value="30000"/> <add key="IdleRemoveExecInterval" value="6000"/> <add key="OpenSessionTimeout" value="10000"/> </ConnectionPooling>Note that ConnectionPoolingOn parameter is not needed in web.config. Uniobjects connection pooling is enabled by setting pooling="native" in db.config. MinimumPoolSize and MaximumPoolSize parameters of web.config are used as defaults only if the db.config entryPoint parameters U2MinimumPoolSize and U2MaximumPoolSize are missing. Setting up Pooled Connections (Universe and Unidata)
Behaviour of Uniobjects Connection Pooling when qcode entry is used (url?ac=qcode)
Behaviour of Uniobjects Connection Pooling when the user changes account
Each database account is configured with a separate connection pool. All requests go through this pool. Excess demand is queued and the allocated maximum number of connections for that account is never exceeded. This way, the available pooled connection licences (Rocket) can be distributed between several accounts as needed Note that a connection pool must have at least two connections (U2MinimumPoolSize) . Setting up Pooled Connections (QM)In db.config, set db="dbaisXXXX" (max 15 chars) where XXXX can be any string. Then in QM, the database should be configured with (POOL= dbaisXXXX,limit,timeout) as per QM documentation. Windows Folder PermissionsIn most deployments you won't need to make any adjustments to folder permissions. db.configOverviewFile db.config is used to configure the DesignBais Web Component (WEBCOMP). It contains parameters such as the database host IP address, database type, email server address and various others. The db.config file is located in your DBNET\admin folder. This file can be edited using Notepad or an xml editor. Changes to db.config take effect immediately without requiring an IIS restart. <dbconfig> <setup> <adminEmail>admin@mydomain.com</adminEmail> <smtpHost>192.168.199.1</smtpHost> <smtpPort>25</smtpPort> <smtpEnableSsl>false</smtpEnableSsl> <smtpHTMLFormat>true</smtpHTMLFormat> <smtpLogin>some_user</smtpLogin> <smtpPassword>some_pass</smtpPassword> <notificationHoldMinutes>60</notificationHoldMinutes> <supportEmail>support@mydomain.com</supportEmail> <supportWeb>http://www.mydomain.com</supportWeb> <logoImageName>logo.jpg</logoImageName> <enableDetailedErrorMessages>true</enableDetailedErrorMessages> </setup><entryPoint> <loginHost>192.168.199.2</loginHost> <loginHostType>UNIVERSE</loginHostType> <loginAccount>DB.NET</loginAccount> <loginUser>uvuser</loginUser> <loginPassword>password</loginPassword> <loginPublicUser>dbuvpublic</loginPublicUser> <requestTimeoutSeconds>60</requestTimeoutSeconds> <debugUser>auser</debugUser> <enableXSSshield>true</enableXSSshield> <allowDomainNamesInLoginNames>false</allowDomainNamesInLoginNames> <convertLoginNamesToLowercase>true</convertLoginNamesToLowercase> <enableDetailedErrorMessages>true</enableDetailedErrorMessages> </entryPoint><entryPoint qcode="hr"> <loginHost>192.168.199.5</loginHost> <loginHostType>UNIVERSE</loginHostType> <loginAccount>DB.HR</loginAccount> <loginUser>uvuser</loginUser> <loginPassword>password</loginPassword> <loginPublicUser>dbuvpublic</loginPublicUser> <requestTimeoutSeconds>60</requestTimeoutSeconds> <debugUser>auser</debugUser> <enableXSSshield>true</enableXSSshield> <allowDomainNamesInLoginNames>false</allowDomainNamesInLoginNames> <convertLoginNamesToLowercase>true</convertLoginNamesToLowercase> <enableDetailedErrorMessages>true</enableDetailedErrorMessages> </entryPoint><entryPoint qcode="sales"> <loginHost>192.168.199.3</loginHost> <loginHostType>UNIDATA</loginHostType> <loginAccount>DB.SALEST</loginAccount> <loginUser>uduser</loginUser> <loginPassword>password</loginPassword> <loginPublicUser>dbudpublic</loginPublicUser> <requestTimeoutSeconds>60</requestTimeoutSeconds> <debugUser>auser</debugUser> <enableXSSshield>true</enableXSSshield> <allowDomainNamesInLoginNames>false</allowDomainNamesInLoginNames> <convertLoginNamesToLowercase>true</convertLoginNamesToLowercase> <enableDetailedErrorMessages>true</enableDetailedErrorMessages> </entryPoint><entryPoint qcode="weather"> <loginHost>192.168.199.4</loginHost> <loginHostType>D3</loginHostType> <loginAccount>DB.WEATHER</loginAccount> <loginUser>d3user</loginUser> <loginPassword>password</loginPassword> <loginPublicUser>dbd3public</loginPublicUser> <requestTimeoutSeconds>60</requestTimeoutSeconds> <debugUser>auser</debugUser> <enableXSSshield>true</enableXSSshield> <allowDomainNamesInLoginNames>false</allowDomainNamesInLoginNames> <convertLoginNamesToLowercase>true</convertLoginNamesToLowercase> <enableDetailedErrorMessages>true</enableDetailedErrorMessages> </entryPoint><entryPoint qcode="finance"> <loginHost>192.168.199.5</loginHost> <loginHostType>UNIVERSE</loginHostType> <loginAccount>DB.FINANCE</loginAccount> <loginUser>user</loginUser> <loginPassword>password</loginPassword> <loginPublicUser>publicuser</loginPublicUser> <requestTimeoutSeconds>60</requestTimeoutSeconds> <debugUser>publicuser</debugUser> <enableXSSshield>true</enableXSSshield> <allowDomainNamesInLoginNames>false</allowDomainNamesInLoginNames> <convertLoginNamesToLowercase>true</convertLoginNamesToLowercase> <enableDetailedErrorMessages>true</enableDetailedErrorMessages> <U2MinimumPoolSize>2</U2MinimumPoolSize> <U2MaximumPoolSize>6</U2MaximumPoolSize> </entryPoint><connectionSpecs> </dbconfig><connectionSpec type="UNIVERSE" host="192.168.199.2" pooling="none"/> <connectionSpec type="UNIVERSE" host="192.168.199.5" pooling="db" max="6"/> <connectionSpec type="UNIDATA" host="192.168.199.3" pooling="native"/> <connectionSpec type="D3" host="192.168.199.4" pooling="db" max="3"/> <connectionSpec type="UNIVERSE" port="31438" host="192.168.199.5" pooling="native" defaultloginUser="dbnetuser" defaultloginPassword="dbnetuser"/> </connectionSpecs>As seen in this example, db.config file can have
setup node
keySpecs node for Amazon SNS Configuration (SMS)
DesignBais can send SMS messages via the Amazon SNS. Details are provided in the DesignBais Data Component Manual.
<keySpecs> <keySpec name="SNSName"> </keySpecs><SNSKey>SNSKey</SNSKey> <SNSPass>SNSPass</SNSPass> <SNSRegion>SNSRegion</SNSRegion> </keySpec>
SMS logs are in your DBNET/debug. Three log files *SMS.txt, *SMS_OLD.txt and *SMS_OLD2.txt are provided as truncating logs (each cutting off at 300KB and rotating). Amazon also provides logs and stats etc if needed.
entryPoint nodesThe entryPoint node defines the parameters that the WEBCOMP uses to connect to the database. There can be several entryPoint nodes in db.config. A url like http://localhost/dbnet?ac=myaccount1 is directed to the entryPoint having "myaccount1" in its qcode attribute. Set qcode="" for the default entryPoint. A url like http://localhost/dbnet without the ?ac=xxxx parameter selects the default entryPoint.
connectionSpecs Node; Connection Methods & PoolingDesignBais provides three methods for connections between the web server and the database server No pooling:Connections are opened and closed with every request. This type of connection is reliable and resilient against application crashes. This method provides high system throughput with minimum resources but the individual user may experience some delay in cases where a quick response is expected (e.g. a server hit on mouse-over). Native pooling:Connection pooling is provided by your database. DesignBais pooling:Connection pooling is managed by DesignBais. It provides high system throughput and a responsive experience for the user. A cheaper alternative to native poolers. In this configuration, connections are fast but not used very efficiently as a connection is not shared between DBNETs. Connection methods can be specified in the connectionSpecs section of your db.config as shown in the following example. Note that connectionSpecs section is optional in db.config and if missing, pooling="none" method is used. <connectionSpecs> <connectionSpec type="UNIVERSE" host="192.168.199.2" pooling="none"/> <connectionSpec type="UNIVERSE" host="192.168.199.4" pooling="db" max="3"/> <connectionSpec type="UNIVERSE" host="192.168.199.25" pooling="native" defaultloginUser="dbnetuser" defaultloginPassword="dbnetuser"/> </connectionSpecs>Attributes of connectionSpec nodes:
The "max" attribute is required only for the "db" pooling modes. Otherwise it can be omitted. The pooling method defaults to "none" if the pooling attribute is omitted. CustomisationLogoReplace the existing images/logo.jpg file with your company logo. This image is displayed on error pages (i.e. dbnet/errors.aspx). Setup NodeThe setup node in file admin/db.config is used to customise a dbnet according to your deployment. You can edit that file (e.g. in Notepad) and configure the setup node as explained in this manual. ImagesNew ApplicationsCreate a new folder under DBNET/images and store all your application images in that folder (e.g. /dbnet/images/myappImages ). Existing ApplicationsIf you're rebuilding an existing DesignBais DBWEB then copy your image files and folders from your existing DBWEB/images to your new DBNET/images. FaviconYou can save your favicon.ico and other favicon files in DBNET/favicon folder overwiting the existing image files.
Favicon is explained here:
A favicon can be generated online:
You may want to add html meta tags to your DBNET to make sure that favicon works properly on all platforms. You can add HTML meta tags to your DBNET as explained in section "HTML Meta Tags" of this document. HTML Meta TagsYou can edit file admin/htmlMetaTags.txt to specify any meta tags as needed. Search Engines (robots.txt)The file DBNET/robots.txt is used to instruct search engines to index a web site or not. It is configured to stop indexing by default but you can change it as needed. Custom JavascriptYou can use the file DBNET/custom.js file to insert javascript code into the page. Note that JQUERY is available if you prefer to use it. Two functions are provided: beforeHitCustom(dbEventSource, dbEventType, dbClass, dbFormName) beforeHitCustom is executed right before a server hit. You can use the input parameters passed by DesignBais:
Returning "false" from this function will cancel the server hit. afterHitCustom(dbEventSource, dbEventType, dbClass, dbFormName) afterHitCustom is executed right after a server hit. You can use the input parameters passed by DesignBais:
Make sure that this function always returns "true" SecurityXSS PreventionDesignBais provides an input filter against XSS (Cross Site Scripting) attacks. The XSS filter can be turned on by setting the enableXSSshield to "true" for each entryPoint selectively. Once turned on, the filter checks all inputs to that DBNET and blocks suspicious entry. Note that the XSS filter may be too strict for some web sites and it can be disabled by setting the enableXSSshield to "false". DesignBais also provides a mechanism to facilitate output encoding. Please refer to your DesignBais Data Component (DATACOMP) user manual for details on how output encoding works. IIS Security ChecklistThe following Microsoft article provides guidance on how IIS should be secured: https://technet.microsoft.com/en-us/library/jj635855.aspx DDOS and Brute Force AttacksIIS Dynamic IP Restrictions Extention can be installed on IIS to provide protection against DDOS and brute force attacks. Unwanted HTTP HeadersUnwanted HTTP Headers can be removed by installing the StripHeaders Module. Secure Uploads FolderWhen IIS is set to Anonymous or Anonymous+Basic Access, authentication can be provided via the DesignBais login form, or a custom login form provided by the application. Note that DesignBais default authentication mode is Anonymous+Basic. In these situations, unauthenticated user access to a static file in the Uploads Folder can be prevented. To enable this feature, change Uploads Folder settings in web.config as follows:
<location path="uploads" allowOverride="false"> <system.webServer> </location><handlers accessPolicy="Read,Execute"> </system.webServer><remove name="myHandler"/> <add name="myHandler" verb="*" path="*" type="DesignBaisNET.checkAuth"/> </handlers>and set "Secure Uploads Folder" flag to yes in System Parameters. Note: This feature should not be enabled when Basic or Windows authentication is the only mode set for the DBNET in IIS. It can be enabled if "Anonymous" or "Anonymous+Basic" authentication is being used.
<location path="uploads" allowOverride="false"> <system.webServer> </location><handlers accessPolicy="Read"/> </system.webServer>Web Site Launch ChecklistBefore launching your web site:
web.config "customErrors" node should be configured as follows (DesignBais default): <customErrors redirectMode="ResponseRewrite" defaultRedirect="httperror.aspx?e=1" mode="On"/> web.config "httpErrors" node should be configured as follows (DesignBais default): <httpErrors errorMode="DetailedLocalOnly"/> web.config "trace" node should be configured as follows (DesignBais default): <trace localOnly="true" enabled="false" pageOutput="false" requestLimit="40"/> web.config "compilation" node should be configured as follows (DesignBais default): <compilation debug="false" strict="true" explicit="true" targetFramework="4.5"/> Admin ToolsThe Site Monitor, DBSiteMonitor.exeOverviewA proper Web Application Firewall (WAF) protects your web sites against cyber attacks. But, if you don't already have a WAF, the DBSiteMonitor can protect your DesignBais web sites against some common types of attacks. DBSiteMonitor runs on your web server and monitors your DesignBais web sites. When an attack is detected, it blocks the IP address of the attacker. DBSiteMonitor also monitors the IIS application pools and restarts an application pool if it has stopped (e.g. due to a url scanning attack). Most common url scanning attacks result in a series of http 404 (not found) errors in quick succession and sometimes these attacks may cause a shut down of your web sites. DBSiteMonitor detects such attack patterns and queries a remote web service to see if the IP address of the attacker is already blacklisted. DBSiteMonitor blocks the IP address on IIS if the blacklist check turns out positive. DBSiteMonitor.exe is located in your /admin/DBSiteMonitor folder as follows: 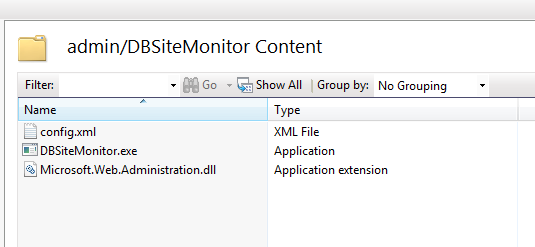
An example a Site Monitor configuration file: <config> <adminEmail/> <smtpHost/> <HIT_PERIOD_SECONDS>120</HIT_PERIOD_SECONDS> <site> <url>http://localhost/dbnet/?dbheartbeat=yes</url> <appPool>dbnetpool</appPool> <login>mylogin</login> <pass>mypass</pass> </site><site> </config><url>http://localhost/db/remotetest.asp</url> <appPool>dbwebpool</appPool> <login>mylogin</login> <pass>mypass</pass> </site>Site Monitor configuration parameters:
Set up Procedure
StartingYou can put DBsiteMonitor.exe in Windows Task Scheduler to make sure that it starts when the web server is restarted. LogsLog files are generated in the folder where DBSiteMonitor runs. All activity is logged in file dbIPFilterlogs.txt (i.e. blocked ip addresses and IIS Application Pool restart events). iplist.txt file provides a list of blocked ip addresses and the date and time of the block. This file is used internally and it must not be deleted or edited. Notes on OperationMost logged events are also emailed to the system administrator If more than 100 IP addresses have been blocked then those addresses older than 15 days are unblocked. If more than 200 IP addresses have been blocked then no more IP addresses are blocked The Purger, DBNetPurge.exeYou may want to delete old and temporary files from your DBNET. Any purge utility can be used for this purpose. DesignBais provides its own purger to help you with that: admin/DBNETPurge/DBNetPurge.exe Folders to be purged are specified in config file admin/DBNETPurge/purgeconfig.xml An example purge configuration file: <purgeconfig> <folder hours="48">C:\inetpub\wwwroot\dbnet\keystore</folder> <folder hours="240">C:\inetpub\wwwroot\dbnet\debug</folder> <folder hours="2400">C:\inetpub\wwwroot\dbnet\uploads</folder> </purgeconfig>In this example, files older than 48 hours are deleted from the keystore folder. Purging the keystore folder with a 48 hour cut-off and the debug folder with a 240 hour cut-off is recommended. The uploads folder and any other folder you might add to your DBNET can also be purged by adding to the configuration file as shown above. You can set up DBNetPurge.exe as a scheduled task in Windows and configure the task to run every night. Purging of files does not affect the operation of the web site. Purge logs can be found in file admin/DBNETPurge/purgeLog.txt CAUTION: Do not configure purgeconfig.xml with folders that must not be purged. web.config files are not deleted by the purge program. Testing EmailsDesignBais email functionality can be tested using the test page admin/emailTest.aspx. The test program uses the email server parameters as specified in admin/db.config. These parameters are:
Testing File UploadDesignBais file upload functionality can be tested using the test page admin/uploadTest.aspx. Encrypting db.configSome organisations prefer their config files encrypted. To encrypt your db.config file:
RTF EditorDesignBais provides an optional module to enable editing in RTF. Please contact us if your platform requires an RTF Editor. Note that the RTFServer can be installed only on Windows 8, Windows Server 2012 and later operating systems
DBMailDesignBais provides DBMail as an optional module. DBMail can be used to send emails with attachments (e.g. pdf, xls etc.). Running outside IIS, DBMail helps reduce the load on the web server and make your applications more responsive. Please refer to the user manual for details.
File uploads via Web Services
Configure the wsUpload child node of the setup node as explained in "db.config" section of this manual. The wsUpload node enables file uploads via web services.
<form method="post" action="https://mydomain/dbnet/wstransfer.ashx" enctype="multipart/form-data"> <input name="postedFile1" type="file"/> <input name="postedFile2" type="file"/> <input name="key" value="mykey89769876" type="hidden"/> <input type="submit" value="submit"/> </form>
The caller (an external organisation) can post binary files (images, videos etc.) to the target url.
TroubleshootingTest PagesAssuming that your DBNET is located at http://localhost/dbnet
Connection TestsConnection test programs are provided in folder /admin/TestHarness for all supported platforms. Run these programs to see if the web server can communicate with the DesignBais data component. A successful Universe test would look like this: 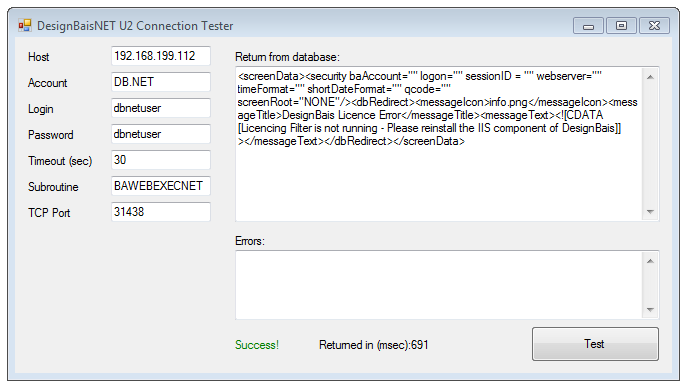
System LogsSystem logs are found in DBNET/debug folder. debug.txt Filedebug.txt file logs data sent and received between the web server and the database server for debugUser as specified in db.config. The log stops around 750KB. debug.txt file can be deleted anytime. If deleted, it's recreated by the system and starts logging again. Debug file uses the normalised computer name as a prefix: e.g. COMPUTERNAME_debug.txt
The first line of each data packet sent to the database contains the following parameters: logon:... IP:.... url:... browser:.... session:.... window:.... hit:... time:.....
You may be interested in the logon and IP parameters showing the login name and the IP address of the user respectively. Other parameters may be used by DesignBais for low level diagnostics.
This line is followed by an XML string between the tags; <TO>...</TO>
Error Log FilesDBNET/debug folder also stores error logs in individual files. An error file name can be in one these two forms:
A few things to note on error file names: The second form is used if the login name or the account name cannot be determined
ErrorReportCode is a six character string that is displayed to the user when an error occurs. Users are expected to report these codes if they encounter any errors when using the application
NormalisedAccountName is the database account name after all non-alphanumeric characters removed. (e.g. c:\xyz\abc becomes cxyzabc)
Reporting a Problem to DesignBaisIn some cases you'll be able to fix problems by using the details provided in system logs. Sometimes you may need to send them to us (DesignBais) for analysis. In reporting a problem provide debug.txt and error log files captured at time of the incident. NotesA spell checker is no longer provided as part of DesignBais as all modern browsers already provide spell checking. FAQCan I save my DBNET folder anywhere on the server? Yes, you can. Your DBNET does not have to be under c:\inetpub\wwwroot. When you create a DBNET virtual folder in IIS, you can set its physical folder as you need (e.g. d:\web\dbnet). After that you can convert that virtual folder to an IIS application. Can I leave my DBNET folder as a virtual folder in IIS (not convert it to an IIS application)? No. Each DBNET must be converted to an application in IIS. |
||||||||||||||||||||||||||||||||||||||||||||||||||||||||||||||||||||||||||||||||||||||||||||||||||||||||||||||||||||||||||||||||||||||||||||||||||||||||||||||||||||||||||||||||||||||||||||||||||||||||||||||||||||||||||||||||||||||||||||||||||||||||||||||||||||||||||||||||||||||||||||||||||||||||||||